I recently upgraded my steering wheel and pedals from a Logitech G27 to a Thrustmaster T500RS with T3PA Pro pedals. On a side note, I also added a Ricmotech load cell modification kit to my brake pedal. I recommend this load cell modification for any standard brake pedal.
Where to buy?
If you’re in the market for a T500RS for iRacing or any other racing simulation, there are quite a few places you can get them. I recommend either Amazon or Ricmotech. If you have Amazon Prime you can save on shipping, but Ricmotech also offers free shipping on items over $100. With that in mind, the only upside to ordering from Amazon is that you are probably going to get your wheel sooner. Ricmotech’s free shipping isn’t very fast, and it does take them a few days to actually ship your order in my experience. The upside to ordering from Ricmotech is that you can get the wheel with the load cell modification pre-installed. If you want the load cell on your brake pedal, ordering from Ricmotech will save you some work and around $20. If you want a really good wheel and a brake pedal that feels like the pedal in a real race car, I recommend ordering the modified Thrustmaster T500RS from Ricmotech.
If you don’t plan to use a load cell brake, there is a brake mod that comes with the Thrustmaster that is pretty good and it’s very easy to install. I recommend you install it using the instructions provided with your wheel and pedals.
Getting Started
After you get everything connected and get the Thrustmaster software downloaded and installed, you will want to head over to the Control Panel. Windows keeps trying to hide the control panel from users, and they’ve done a pretty good job of it with the latest update to Windows 10, but there are at least a couple of ways you can get into the settings for your Thrustmaster T500RS.
- Click Start or the little Windows icon on the left side of the task bar. In your list of programs, scroll down to Thrustmaster. Click it, then click Control Panel. In the small window that appears, click Properties. Also note that there is a Firmware Update link under Thrustmaster. You can update your firmware quickly and easily using that link.
- Click Start or the little Windows icon on the left side of the task bar. Click Settings (the cog or gear icon), then type USB Game Controllers in the search box. Click Set up USB Game Controllers. In the small window that appears, click Properties.
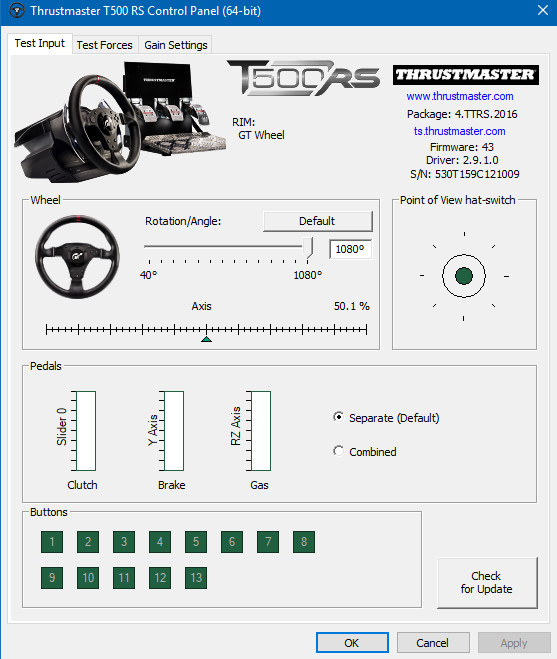
Now you should end up with a window that looks something like the image below.

Note the Check for Update button on the lower right. You should occasionally use it to make sure your wheel software is updated.
Here on the Test Input tab, you should set your Rotation/Angle to 900° or higher. iRacing will only use 900° of rotation so anything higher is basically ignored. You should probably rotate your wheel and work your pedals just to make sure everything is working. If you have a brake mod installed, you should get the brake slider all the way to 100%. Don’t stomp the pedal. Press it firmly. If you have a load cell modification installed you may have to press pretty hard to get to 100%. Ricmotech has instructions for calibrating their load cell mod, but they actually didn’t work for me. I found it worked best to simply press hard enough to get the slider to 100% and leave it at that.
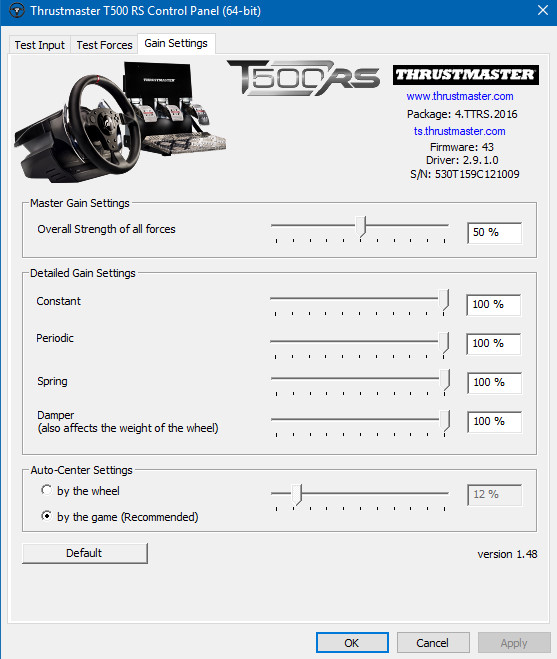
Next, click the Gain Settings tab. You will be presented with a window that looks similar to the image below.

Leave all of this at default except the Overall Strength of all forces setting. iRacing recommends that you set this between 50% and 60%. This is really a personal preference and you can change it at any time based on the amount of force feedback you want. I tried it at 55% for a while, then moved it down to 50%. Now I’m thinking about trying 40 or 45% because I’ve never really liked a lot of force feedback. I drive on dirt almost exclusively and that requires a lot of wheel input, so a lot of force feedback can become tiring after a while. You will also be able to adjust force feedback within iRacing of course, and I’ll have more later on that. This is a master gain or strength setting and you will see the value of it later.
That’s all there is to configuring the wheel and pedals in Windows. Now we can move on and get ready to turn some laps in iRacing.
So let’s get the iRacing simulation open and running with a good car and track loaded. If you just got your Thrustmaster, try a car and track with which you are familiar.
First, you’re going to be prompted to calibrate your input device. If you’ve already done that, you can skip this or go through part or all of the calibration process again. If you’re using a load cell, it’s important that you calibrate it properly in iRacing.
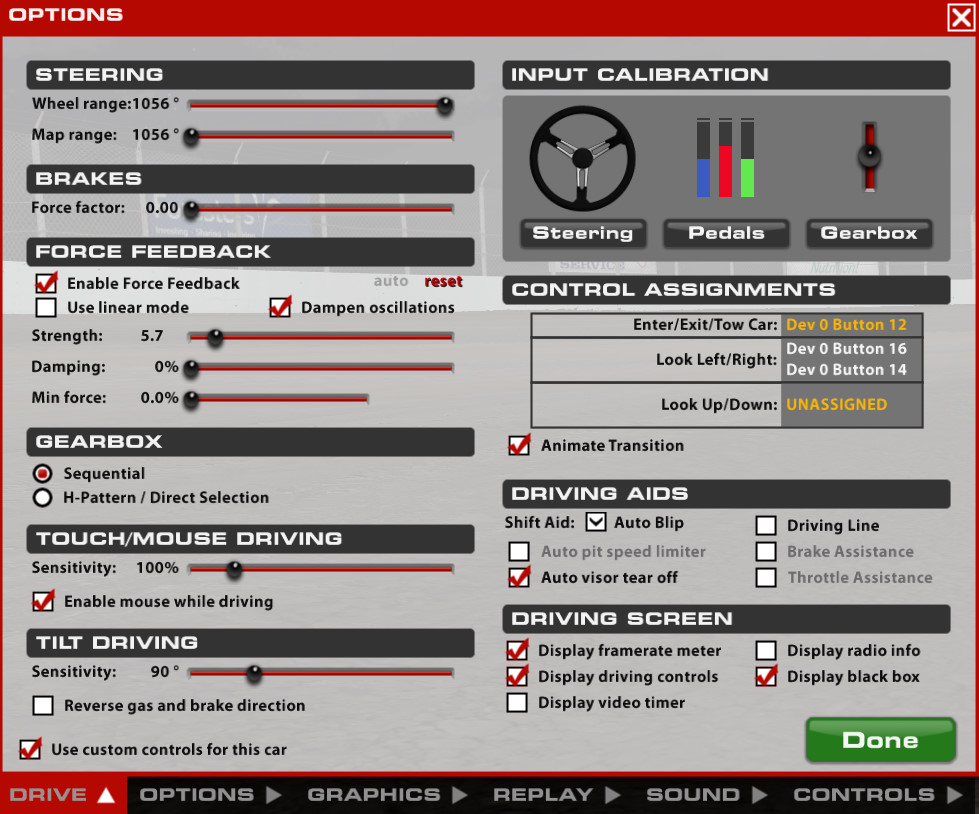
Click Calibrate or click Options to get a window that looks something like the image below.

Go through the calibration procedure beginning with your steering calibration. Follow the instructions on the screen. When you are instructed to turn your wheel 90° to the left, do it by sight, ignoring the numbers on the screen.
Before you begin to calibrate, check the following:
- Set Force factor, under BRAKES. If you have a load cell, you must set this to zero. If you don’t have a load cell, you can leave it at about 1.8 or set it to zero, it’s really a personal preference with which you can experiment. Any time you change your brake force factor, you should probably recalibrate your pedals.
- Check dampen oscillations.
- Set Strength anywhere from 2 to 15. We’ll go over the Strength setting in more detail later. I suggest 5 as a good place to start for now.
- Set Damping to zero.
- I recommend setting the Min force to zero for this wheel.
- Check Use custom controls for this car.
If the controller has never been calibrated in iRacing, you will probably have to calibrate it, then go back and change the settings above, then recalibrate your pedals only.
Calibration is very straightforward. Calibrate your Steering first, following the instructions on the screen. The standard pedal calibration is also very simple and straightforward.
If you are using a load cell in your brake pedal, you will have to experiment with the amount of force you want to apply for full 100% brake. With my Ricmotech load cell, I have to apply a LOT of force to get the calibration slider all the way to the left (zero). I tried to use that setting for a while then decided it was too difficult to use that much force, especially with heavier cars like the iRacing Dirt Street Stock or Late Models. When I calibrate the brake, I only press hard enough to get the slider between 250 and 300. It still takes some force to get the brake to 100%, but it’s not excessive. It’s really a matter of personal preference and the cars that you drive. Light sports cars or road cars with good brakes will be quite different from heavier stock cars.
Now that you have everything calibrated, you can move on to your Strength settings. If you want to use different force feedback strengths for each car you drive (recommended), you need to have Use custom controls for this car checked in Options. It will require one-time calibration in every car you drive, but it’s worth it in my opinion.
How to Set and Save Your Force Feedback For Each Car in iRacing
Now it’s time to make a few laps and get your force feedback set properly for your first car. I hope you picked a good car and track.
 Make a few laps, at least two good laps and more if possible. Stop on the track without getting out of the car.
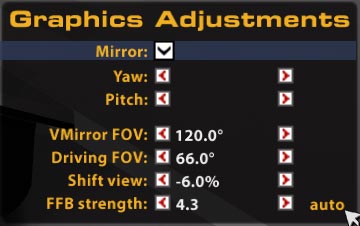
- Press the F9 key. That brings up the Graphics Adjustment black box, shown to the right.
- FFB strength is shown at the bottom of the black box. If you made at least two laps you will see auto in the lower right corner. Click auto to set your force feedback for this car.
Don’t forget, you must have Use custom controls for this car checked on the Options screen in order to save the force feedback setting specifically for this car. You will need to go through this process for each car that you drive frequently. It’s a little extra effort but it’s worth it.
If you have any questions about any of this, feel free to join me in the OSR Discord Server.