This will be a brief tutorial that should help iRacers adjust their setups to better suit their driving styles. I’ll provide a couple of tips that will help you get your car tighter or looser, whichever you need. I’ll also answer a couple of common questions:
- How do I tighten or loosen the car on entry?
- How do I tighten or loosen the car on exit?
- What do I do if the car is loose or tight throughout the corner?
- How do I adjust the cross weight in an iRacing setup?

Logitech G923 Racing Wheel & Pedals
One of the most popular entry-to-mid level sim racing wheels available today. The G923 delivers strong TRUEFORCE feedback up to 1000 Hz that lets you feel the road with refreshing clarity, a responsive brake pedal with progressive spring, and a solid set of pedals built for consistent control. It includes a programmable dual-clutch launch system for cleaner starts, a genuine leather-wrapped wheel, and straightforward compatibility with PC, Xbox Series X|S, and Xbox One.
Buy on AmazonAffiliate link • Ships fast from Amazon
These changes are applicable to all asphalt oval cars. The cross weight adjustments should work on all dirt cars except the Sprint Cars. If you want to know how to adjust iRacing Sprint Car cross weight, go here. The images used are taken from the iRacing Super Late Model setup screen. As far as I know, all of the iRacing asphalt cars are adjusted the same way. Some of the names, most notably in the asphalt Street Stock springs, are different, but the process is the same.
Sometimes the handling of the car might not be to your liking. Sometimes weather differences will require changes to either tighten or loosen the setup. For warmer track temperatures, you are going to need to tighten the car. When the track is cooler, you may want to loosen the car some.
There are two main ways to tighten or loosen the car.
- Track bars.
- Cross weight.
Always try to start with the track bars first. Adjust the cross weight for more extreme conditions or different circumstances.
- If the car feels loose throughout the corner, lower both track bars evenly. Conversely, if the car feels tight throughout the corner, raise both track bars.
- If the car feels loose on corner entry, lower the left track bar. If the car feels tight on corner entry, raise the left track bar.
- If the car feels loose on corner exit, lower the right track bar. If the car feels tight on corner exit, raise the right track bar.
- If the car feels as if it wants to break loose under throttle in the center or on corner exit, or drive off the right rear wheel (wheel spin), increase the cross weight. Some people add preload to the sway bar to make cross weight adjustments. I don’t really recommend it. The preferred way to adjust the cross weight is by moving weight around. The proper steps to do this are outlined below.
- Note the cross weight.
- Disconnect the sway bar and zero (unload) it. (Uncheck the box beside Attach left side and use the arrows beside Left bar end clearance to zero the preload).
- Note the new cross weight and the ride heights.
- Adjust all four spring perch offsets to change the cross weight. Refer to the images below.
How to raise the cross weight in an iRacing asphalt setup.
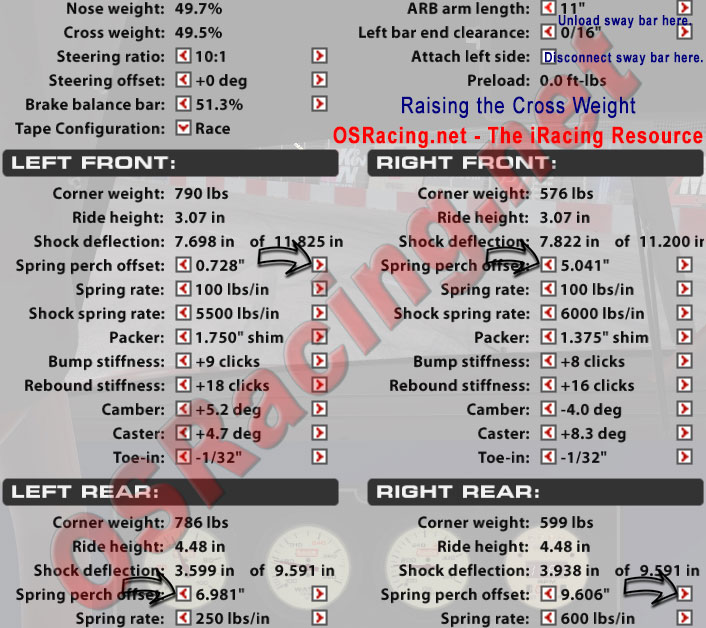
Try one or two click on each spring perch shown above to raise the cross weight. Make small adjustments, about one half of one percent. You can try bigger adjustments if you can’t tell much difference in the handling after you make smaller adjustments. It’s important to make even adjustments, meaning you should make the same number of clicks on each spring perch. This will help keep your ride heights in the ballpark. After you get the cross weight where you want it, adjust the ride heights. You need to keep the ride heights as close as possible to where they were before you started. You can then make fine adjustments with the sway bar preload if desired.
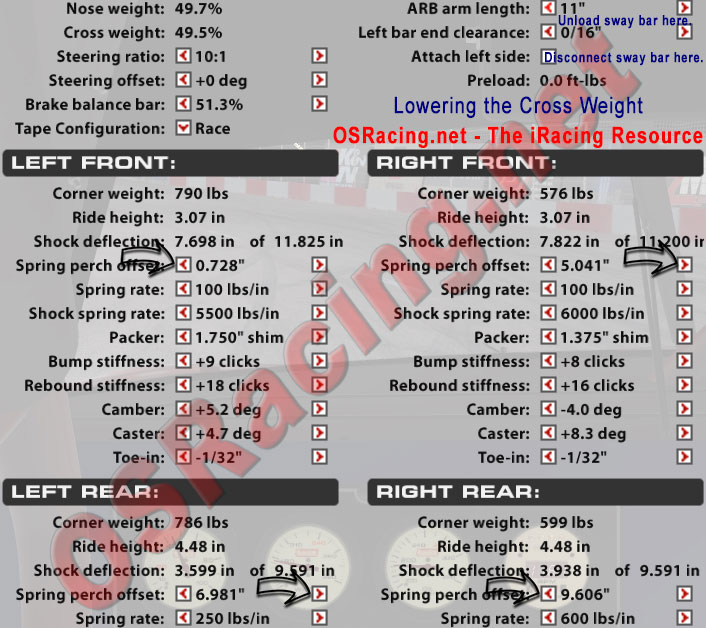
If the car is tight under throttle, or driving off the left rear, invert the spring perch offset adjustment procedure above. Here’s a helpful image.
How to lower the cross weight in an iRacing asphalt setup.
I have found that these are the best ways to adjust iRacing setups to suit your driving style, or to handle better under different temperature conditions.
This guide was awesome! Thanks a lot for making it. I was also wondering, are there any tricks you have to make your tires wear slower without damaging speed
Lift earlier, and/or drag the brake just a little bit on entry.
When you enter the corner you are going to slow down. In order to slow you must lose (kinetic) energy. That energy has to go somewhere, (1st & 2nd law of thermodynamics) so it can either go into tires causing them to heat up lose grip and wear faster, or you can try to take up some of that heat up into the brakes where it will be dissipated on exit and down the straight.
That’s the theory and the science anyway. The artistry comes in when you actually do it.
Great advice! Love it when people explain “why” something’s done rather than just saying “this is how it’s done.”
Thank you Jeff! Looking forward to the tips for Dirt Oval racing! *-*
It’s a whole lot more driver and a whole lot less setup on dirt.
Yeah! I have little experience on dirt but can definetely notice this! For me it’s very hard to be consistent and to adapt to the changing track states!
Am I correct that you would reattach the sway bar after making the perch adjustments?
It’s not necessary unless your own a road course. It might help to leave it unattached on ovals.
Very well explained thanks
I’m lifting early and using zero brake. Is this why I’m wearing out the right front? Then should I use brakes more?
It’s hard to say without more information. You might try a little trail braking. Drag the brake lightly as you enter the corner.
If you use no brakes you can wear the right front. Although I’m sure you’re backing up your corner and lifting early, it can still wear the right front because the tendency is to lift as late as possible which can cause a faster corner entry than you might realize, causing the RF to heat up. All this really depends mostly on the track and maybe the car you’re driving. I would trail brake or lift earlier.